The purpose of the following tutorial is for you to know what the new GA4 (Google Analytics 4) property is, learn to differentiate the main features between UA (Universal Analytics) and GA4, have a dual installation of both properties, correctly configure GA4 and create event parameters with Tag Manager to be able to view them in GA4 reports.
If you don't have the new GA4 property installed, it's time to do so. Why? Because starting July 1, 2023, Universal Analytics will stop processing data. At Elevam we recommend that until that date you have a dual installation, that is, using both the Universal Analytics property and GA4. Are you ready to discover and migrate to GA4? Let's start.
What is Google Analytics 4?
GA4 is a measurement tool that collects data from websites and applications, with the goal of helping us understand how users behave when navigating a website or applications. New devices and platforms keep appearing, and measuring user interaction across them is essential. If we can't measure a website or application, we can hardly improve it.
Google Analytics 4 vs Universal Analytics
Let's look at some differences between UA and GA4:
- The main feature of (GA4) is that it uses events and parameters instead of session-based data (UA). It can group multiple events into a single hit.
- What in UA we knew as Pageviews, in GA4 are page_view events. It comes activated by default in the enhanced measurement events.
- They include predictive functions based on Analytics intelligence, such as statistics, which answer some of the most requested questions like: How many users did I have last week? What are my best pages and screens by views?
- In GA4 we won't have as many reports as in UA. The number of reports is reduced, but the best part is that it offers us the possibility to create 100% personalized reports. It allows us to measure data more accurately.
- GA4 is more friendly with user privacy. It gives us the option to perform different configuration options to guarantee user privacy. Some options are Google signals, User-ID [GA4] and consent mode.
- GA4 isn't as intuitive as UA. It requires more experience in web analytics and more technical knowledge.
- Another difference between the two properties is that UA shows the Views, while in GA4 Views disappear.
Did you know? Google Signals allows measuring across devices all users who navigate logged in with their Google account. It's one of GA4's novelties to avoid measurement with cookies.
How to have a dual installation in Google Analytics
We start from the basis that we already have the UA property properly installed. What we're trying to achieve is to migrate and slowly adapt to the new GA4 property. Below, we indicate how to perform the installation of the new GA4 property.
To install a GA4 account is very easy:
- Once we've logged into Google Analytics, in the lower left part, there's a button that says Admin. We have to click on it.
- At the top, we have to press the Create account button.
We proceed to configure the account data:
- We include an account name. Normally, the domain is used.
- We choose the options to share data with Google Analytics. It's usually left as default.
- We press the Next button
We proceed to configure the property data:
- We enter the property name. (As with the account, the domain is usually used).
- We choose the options to share data with Google Analytics. The most common is to leave it as default.
- We select the Time zone and currency.
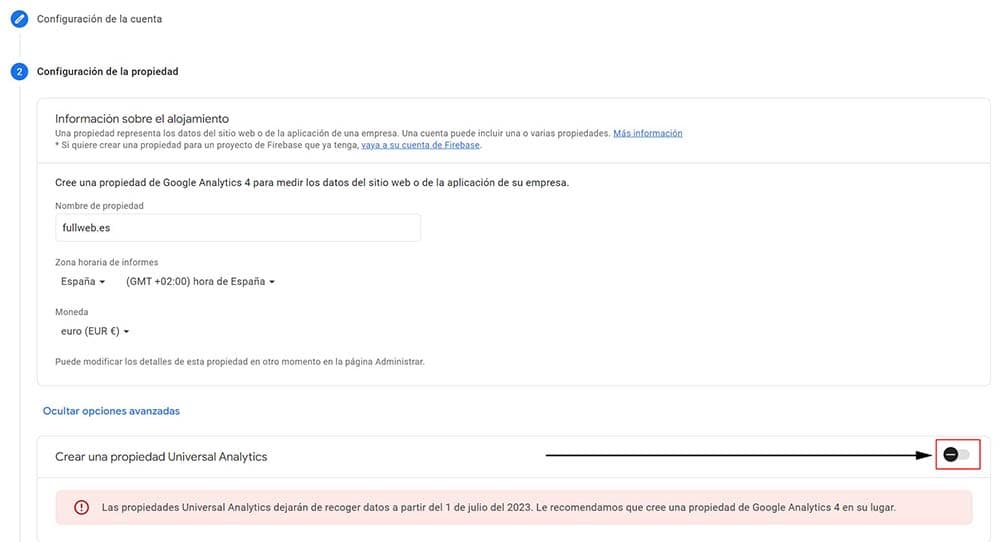
- This is the most important part to have a dual installation in Google Analytics, where we'll need to click on the link Show advanced options. We see a selector "Create a Universal Analytics property", so we have to move the selector so the window gets bigger, showing more information.
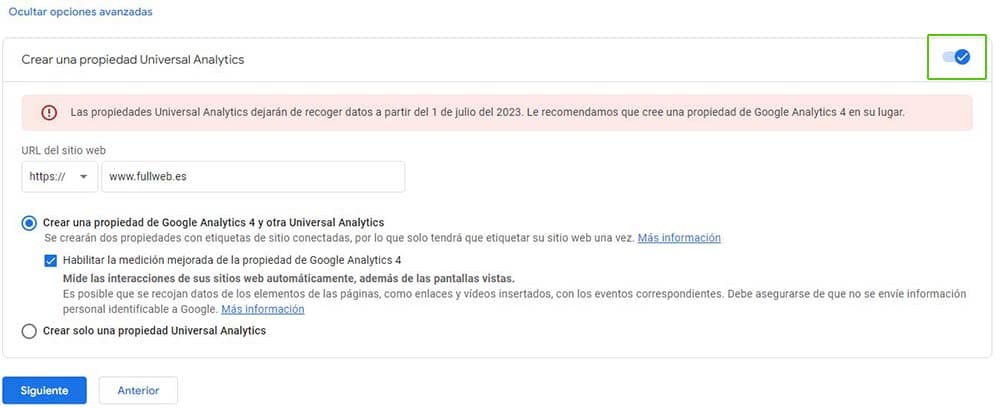
- We enter the URL of the website.
- We leave the other options as they are by default.
- We press the Next button
Now we're going to include the company information:
- We click on Industry category and select one.
- Next, we choose the company size
- We select through the options how we'll use Google Analytics to measure our company. It's not mandatory to fill in.
- Finally, we press the Create button.
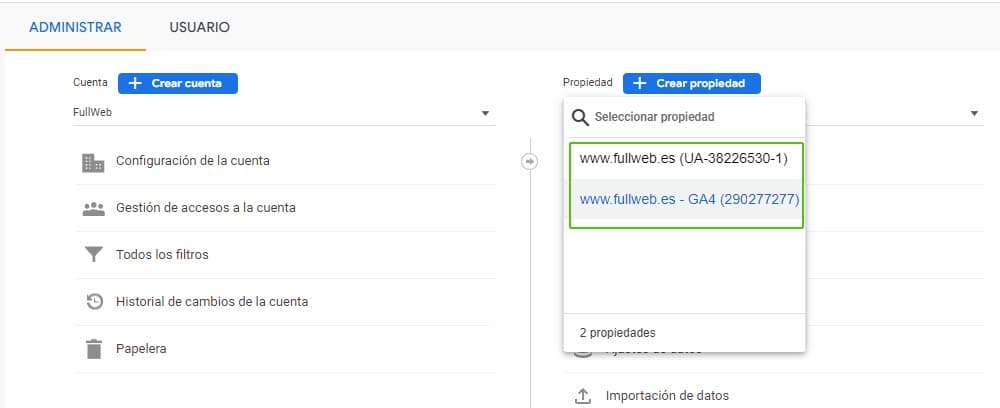
Now we'll check that we've correctly completed the installation:
- We click the Admin button and the Google Analytics interface will show us 3 sections, Account, Property and Views.
- We open the "select property" selector.
- If we've followed the steps correctly, we should see at least 2 properties, the UA one and the GA4 one.
Great! We have everything ready to install the Google Analytics tag.
Different ways to install the Google Analytics GA4 tag
At this point, all that's left is implementing the Google Analytics GA4 tag so it starts collecting data.
- We press the Admin button, and in the property section, press Data Streams.
- We select Web.
- It'll show us some data, we click on the stream name on the arrow that comes out on the right >.
- The window will open. In the Google Tags section, we select View tag instructions.
- We enter this section. There are several ways to install the Google Analytics tag
- Through a plugin
- Manually: we must copy and paste the code on each page of our website, right after the
<head>element - Through Google Tag Manager (GTM), we explain it below.
We'll perform the installation through GTM (Google Tag Manager), since this tool will help us later to manage new event tags.
Installing the GA4 tag through Google Tag Manager
Before continuing, we must have Google Tag Manager properly installed. If it turns out very complicated, we can do the installation through a plugin.
Other ways to install GTM through a plugin:
- Install Google Tag Manager on Wordpress: https://www.youtube.com/watch?v=IXeoFxJN9F0
- Install Google Tag manager Drupal: https://www.youtube.com/watch?v=jqgxSWN73zc
Now yes, once Google Tag Manager is installed, we'll proceed with the installation of the Google Analytics tag in GTM.
- We click on Tags
- We click on the New button
- We insert a name to identify the tag, for example ID-GA4
- We click on Tag Configuration, we select: Google Analytics: GA4 configuration
- We enter the MEASUREMENT ID. We can find it in Google Analytics in Stream details. We copy and paste the MEASUREMENT ID number in Tag Manager.
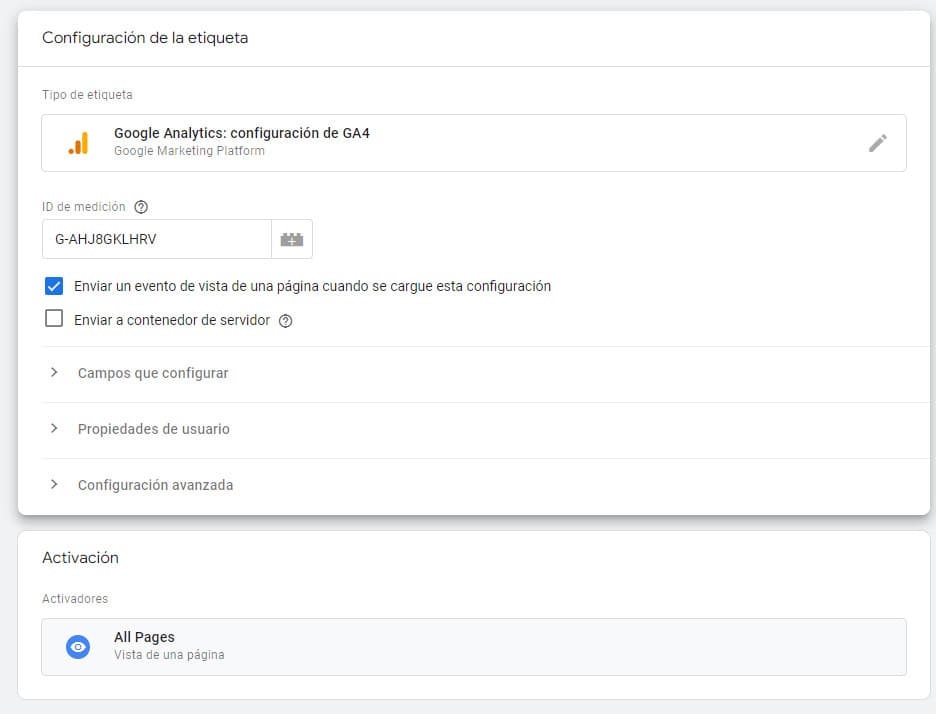
- We click on Triggering.
- We select All Pages.
- We click on the Submit button.
Great! We have the GA4 tag installed. Now we're going to configure GA4's most interesting options.
How to configure Google Analytics 4
Data stream property
In GA4 we can create different data streams, whether for iOS, Android or Web. The interesting thing is we can measure them together or separately. The most used is the Web Data Stream. If we access it, we'll see detailed information of the stream itself like: Stream Name, Stream URL, Stream ID and the Measurement ID (much used in measurement code configuration in Tag Manager). We proceed to configure the Events:
Enhanced measurement events.
To see the events, click on the grainy little wheel)
It's one of GA4's novelties, just by installing the GA4 tracking code there are certain events that can be measured automatically:
- Page views: this event comes activated by default and is known as page_view. Every time a user visits a page, the event is triggered and gives us information about the referrer URL dimensions (page_referrer) and the complete page URL (page_location).
- Scrolls: what comes to be the % of Scroll on a page. When the user scrolls to at least 90% of the page vertically, this event triggers. In UA we'd have to implement it ourselves.
- Outbound clicks: thanks to enhanced measurement, GA4 is able to automatically handle outgoing links or better known as outbound links. It records the event when a user clicks a link and the link's domain doesn't match our website's domain.
- Site searches: if we have our own internal search engine on our website, it's interesting to enable and configure this option correctly, since it provides us with information about which queries the user has performed when navigating our website to find information. For people dedicated to SEO, enabling this option can be a great help to create or improve content.
- Video interaction: works if we have YouTube videos implemented through an iframe on our website. The event captures the interaction by recording the playback, progress and completion of the video. If we want to see how it captures the data in the real-time report, we need to include in the video URL the following parameter "enablejsapi=1". Remember in the iframe in the URL where it says src="https://www.youtube.com/embed/38ceapTbp1g?enablejsapi=1
- File downloads: it lets us know the quantity of files that have been downloaded on a website. It works with the following extensions: pdf | xlsx? | docx? |txt |rtf | csv | exe | key | pp(s|t|tx) | 7z | pkg | rar | gz | zip | avi | mov | mp4 | mpe?g | wmv | midi? | mp3 | wav | wma.
In this link we can consult the enhanced measurement events in GA4
Data settings property
Within data settings, we'll highlight the section that belongs to data collection. In this section we'll control and configure the use GA4 makes of user data.
Data settings > Data collection
Google signals
When a user logs in through a Google (gmail) account and navigates between different devices, it allows GA4 to associate these visits in a more anonymous way. GA4 is able to associate a logged-in user who navigates between different websites and applications, collecting various information and associating it with GA4 data.
We can also configure this option by regions. The collection of Google signals data is currently allowed in 306 regions. If there were a region whose laws didn't allow collecting this type of information, we could configure it not to collect data. It's recommended to leave this option enabled.
Granular location and device data collection
This option has been added recently and allows us to configure by region the collection of granular location and device data. If we disable this option GA4 won't collect information about city, latitude, longitude, screen resolution. It's another of the options that makes GA4 more privacy-friendly with users.
Advanced settings to enable Ads Personalization
This option indicates what use we can make of the data to personalize our ads for advertising campaigns, generate remarketing audiences, etc. By default all countries in the world come enabled. In case any country's legislation/laws didn't allow collecting user data to show ads, create remarketing lists, etc… we could disable it to not collect data and comply with its legislation
User data collection consent
The cookies we generate on our websites are usually analytics and advertising. According to the GDPR, we must comply with the cookie policy.
When the user accepts the consent conditions, we confirm that we have the necessary privacy notices and that we've obtained users' consent to collect and process their data.
There are different widgets that allow us to manage cookies; one of the best known is CookieBot.
Reports in Google Analytics 4
The reports that GA4 shows by default are quite "weak" compared to UA. They provide just enough for a first contact with the data. GA4's idea is that if we want to dig deeper into the data, we use "BigQuery".
The positive side is that we can create our own custom reports to display the most important data for your business with more flexibility.
When we enter the reports we can view the reports summary, real time and then, it divides these reports into life cycle and users. Without going deep into each report, we'll summarize what each one does:
Reports overview
It shows us a series of cards with metrics summarizing what's happening on our website. The good thing is we can customize this type of report, showing the data that best fits our needs.
Real-time
It allows checking the activity a user performs on a website or application during the last 30 minutes. We can check in real time by which source, medium or campaign the user accesses, type of user that visits us, page they've viewed, total number of events they've triggered and conversions by event name.
Life cycle
The types of reports we'll find in this section are focused on events and users. They help us understand the experience of users on our website. For example, from which channel they arrived, until what has been their retention. Let's see the most relevant:
Acquisition
They help us understand how new users have arrived to our website or application. It shows us information about user acquisition and traffic grouped by channels.
- Engagement: once the user arrives at our website, knowing how they interact.
- Monetization: what benefit the user generates on our website. What they buy and what income they generate.
- Retention: how we retain the user. Knowing the regularity with which they come back to visit us, and most importantly, if they buy again.
Users
- Demographics: provides information about the user's origin.
- Technology: which browser, device, operating system… users have used to access our website.
Did you know? In GA4, the bounce rate % is replaced by the engagement rate. Engaged sessions occur when a session has lasted more than 10 seconds, or has had a conversion event or has registered at least 2 page views or screen views. The bounce rate % in UA occurs when on a website a single-page session of 0 seconds duration takes place.
Events in Google Analytics 4
One of the most important changes we can find in GA4 with respect to UA is that everything is measured through events. The measurement system has changed and if we were used to UA, maybe we'll have a hard time adapting to the new change. For example, if in UA we measured as page view, in GA4 it becomes a page view event or page_view.
We must remember that events in UA came accompanied by category, action and label. Well, now in GA4 it's summarized to an event with a name and up to 25 parameters. In GA4 events can be session or user, and it's very important to know the events that GA4 offers us. There are 4 types of events you'll need to know:
- Automatic events: they're the events that are collected by default in the tracking code. These events trigger when basic interactions occur on your website or application.
- Enhanced measurement events: it allows tracking the interactions users perform on your website. For it to work, we have to enable this option in the GA4 interface.
- Recommended events: by using this type of events, GA4 will be able to interpret them correctly. It's highly recommended that before creating a custom event we take a look at the recommended events since this way GA4 will know how to interpret correctly helping us generate more useful reports.
- Custom events: they're events we create ourselves. It's composed of a name and a set of parameters that will collect information about some information we want to track from your website, such as when the user clicks on a mail or phone in a specific city.
Before implementing a custom event, we must check that there isn't an automatic or enhanced measurement event, nor recommended events we can use.
Did you know? We can visualize event parameters in the real-time report. But if what we want is to be able to visualize the parameter of a custom event in the reports, we must create a custom dimension or a custom metric. Another way is exporting the data through bigquery.
Create an event in GA4 with Tag Manager
In this video we show the necessary information about how to create an event with custom parameters with GTM and be able to view it later in GA4 reports.
Video index:
- 00:02:22 Create event tag.
- 00:10:06 See the event parameters in the real-time report.
- 00:13:45 Create a custom dimension in GA4.
That's all, we hope this tutorial helps you get a little more familiar with the new GA4 property.
Do you want us at Elevam to review if your GA4 installation is correct?
Count on it! Make your request, leave your details in the form indicating "GA4 Installation Review" in the subject and we'll get to work.
Related reading
- How to index your website in Google
- Ranking in Google: technique, content and authority
- Best SEO agency: real criteria
Shall we work together?
If you want to apply this in your company with a team that combines technical SEO, GEO and paid acquisition measured against the income statement, request a no-commitment audit. You can also check real case studies or read the public GEO baselines that Elevam Labs publishes every quarter.